So I got an email asking if I could make a Photoshop equivalent of the Railroad brush that I posted a while ago. I said I didn’t know but I’d give it a shot, so here we have one that can make railroad lines in Photoshop.
First, you’re going to want to download the .abr file. It’s zipped, so download, unzip and load into your brushes palette. We’ll need to do some tweaks before using and I’ll explain them below.
https://www.jeffco.ca/blog-content/railroad-brush.abr.zip
Once you have the brushes, you’ll see there are two different brushes, the difference is only size. Basically it’s a ‘+’ sign converted to a brush, simple enough. If you want to try variations, make a ‘+’ and select it and Edit>Define Brush Preset. Any variation would work.
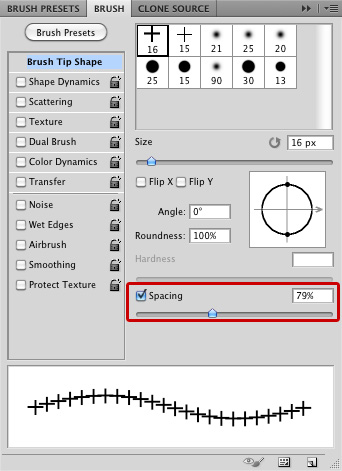
The key becomes the next two palette changes which will give you ‘+’s the telltale railway shape. Under the brushes palette, click on the Brush Tip Shape and change your spacing so that as you draw, the shape spaces out but overlaps. Set the spacing to around 75 to get an overlap that will cover some of the variations in the curves.
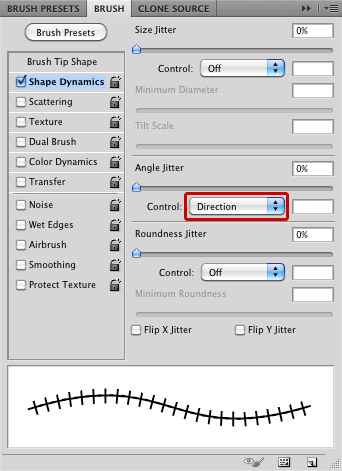
Then, click on the Shape Dymanics option on the left and change the angle jitter to Direction. This will make the shape vary it’s position based on the direction of the line. The makes the rail flow the way the line goes.
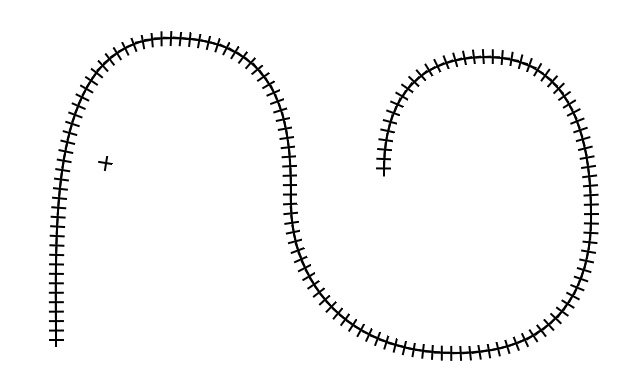
And that’s it, in theory. It will take some practice to get it perfect and to draw a line without bumps that ruin it, but here are two tips that should make it a lot easier. One, draw on a new layer so if one of your attempts fails, you can always try again, or just erase the bumpy parts and you can try those parts again. And two, use the pen tool to make a path that your railway brush will eventually follow. Make a path then use your direct selection tool to smooth out some corners and such to make the perfect path before committing you new brush to it. Then switch to the brush tool, and go to your paths palette, then at the bottom (with the path chosen) choose ‘Stroke path with brush’ and watch Photoshop do all the heavy lifting. If there’s problems, delete the layer, adjust the path, and stroke again. Eventually it should deliver the perfect railway line in Photoshop.
Of course, if you have Illustrator, it’s still a better option to use the railway brush in Illustrator and possibly embed it in Photoshop via a Smart Object, but if you don’t have Illustrator, hopefully this method may be of some use.
Good luck, hope this was helpful!
And if you found this one useful, be sure to check out some of our other free brushes:
hi
thank you so much.i was stuck that how can i show rail tracks in some following path.
you helped..
Glad it was useful for you!
thankyou sooo much
Perfect, thank you
You’re welcome! Glad it was helpful.
Thank you, this was very helpful.
Excellent, glad to hear it.
THank you so much 🙂
You’re welcome! Enjoy!
Thank you for sharing!
Happy new year!
My pleasure, happy New Year to you too!
Doesn’t work for Photoshop 7
Sorry to hear that, but thanks for letting me know.
Thanks!
Thank you so much. this was so helpful!!!
Thanks for letting me know. So glad it was useful to you!
Thank-you!!! Just imagine all the time you’ve saved so many people… brilliant!!! ^_^
Aw, thanks! Glad it helped!